前言
先看看在iPhone上使用Cocos2d-x与OpenGL ES绘制出来的最终效果。
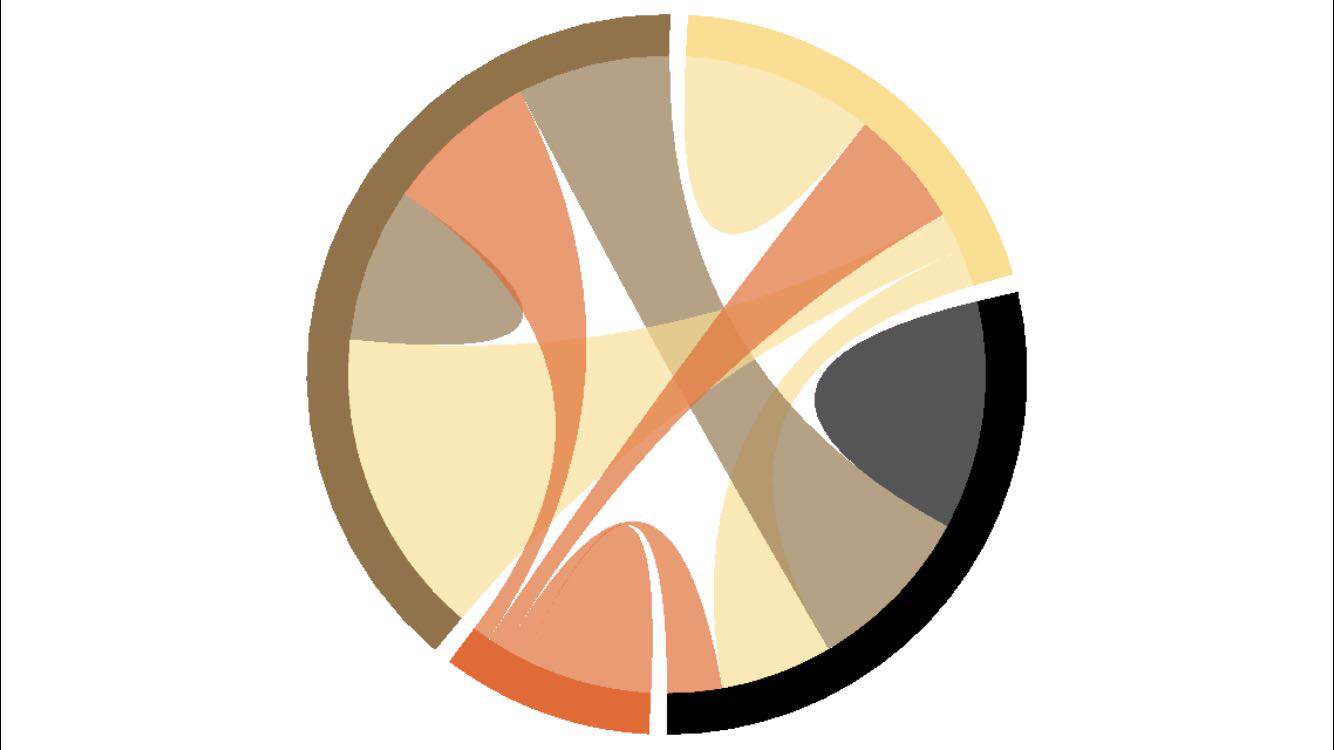
图中绘制的都是圆环,或者光滑曲线构成的图形。不过本质还是绘制多边形,只要这些多边形的顶点足够多,那么就可以形成光滑的曲线。
在绘制过程中使用到的相关知识点:
- Cocos2d-x渲染机制
- OpenGL ES绘图基础
- Objectice-C与C++混编
- OpenGL Tessellation将多边形切分成多个三角形
问题的发现
在使用Cococs2d-x绘制填充颜色的多边形的时候,最先想到的就是使用DrawNode 。DrawNode提供以下接口:
1
2
|
void drawSolidPoly(const Vec2 *poli, unsigned int numberOfPoints, const Color4F &color);
|
使用该接口绘制一个四分之一圆环的时候,想达到的效果如下👇

但是实际的效果却是这样的👇

查看源码
查看Cocos2d-x的DrawNode的源码:CCDrawNode.cpp
1
2
3
4
5
|
void DrawNode::drawSolidPoly(const Vec2 *poli, unsigned int numberOfPoints, const Color4F &color)
{
drawPolygon(poli, numberOfPoints, color, 0.0, Color4F(0.0, 0.0, 0.0, 0.0));
}
|
问题的关键还是在drawPolygon接口,该接口绘制一般的多边形,它的实现原理很简单:根据顶点,将多边形划分成多个三角形,然后使用OpenGL绘制指令交由GPU绘制
来看看具体实现:
1
2
3
4
5
6
7
8
9
10
11
12
13
14
15
16
17
18
19
20
21
22
23
24
25
26
27
28
29
30
31
32
33
34
35
36
37
38
|
void DrawNode::drawPolygon(const Vec2 *verts, int count, const Color4F &fillColor, float borderWidth, const Color4F &borderColor)
{
CCASSERT(count >= 0, "invalid count value");
bool outline = (borderColor.a > 0.0f && borderWidth > 0.0f);
auto triangle_count = outline ? (3*count - 2) : (count - 2);
auto vertex_count = 3*triangle_count;
ensureCapacity(vertex_count);
V2F_C4B_T2F_Triangle *triangles = (V2F_C4B_T2F_Triangle *)(_buffer + _bufferCount);
V2F_C4B_T2F_Triangle *cursor = triangles;
for (int i = 0; i < count-2; i++)
{
V2F_C4B_T2F_Triangle tmp = {
{verts[0], Color4B(fillColor), __t(v2fzero)},
{verts[i+1], Color4B(fillColor), __t(v2fzero)},
{verts[i+2], Color4B(fillColor), __t(v2fzero)},
};
*cursor++ = tmp;
}
if(outline)
{
}
_bufferCount += vertex_count;
_dirty = true;
}
|
具体分析下将多边形划分成三角形的步骤:
假设有5个顶点(1-5),那么可以分成 5 - 2 = 3 个三角形。以1号顶点为基础,这三个三角形分别是
①②③
①③④
①④⑤
那么当这些顶点构成的多边形是凹多边形时就会出现问题(覆盖了不需要绘制的区域),画个图解释一下:
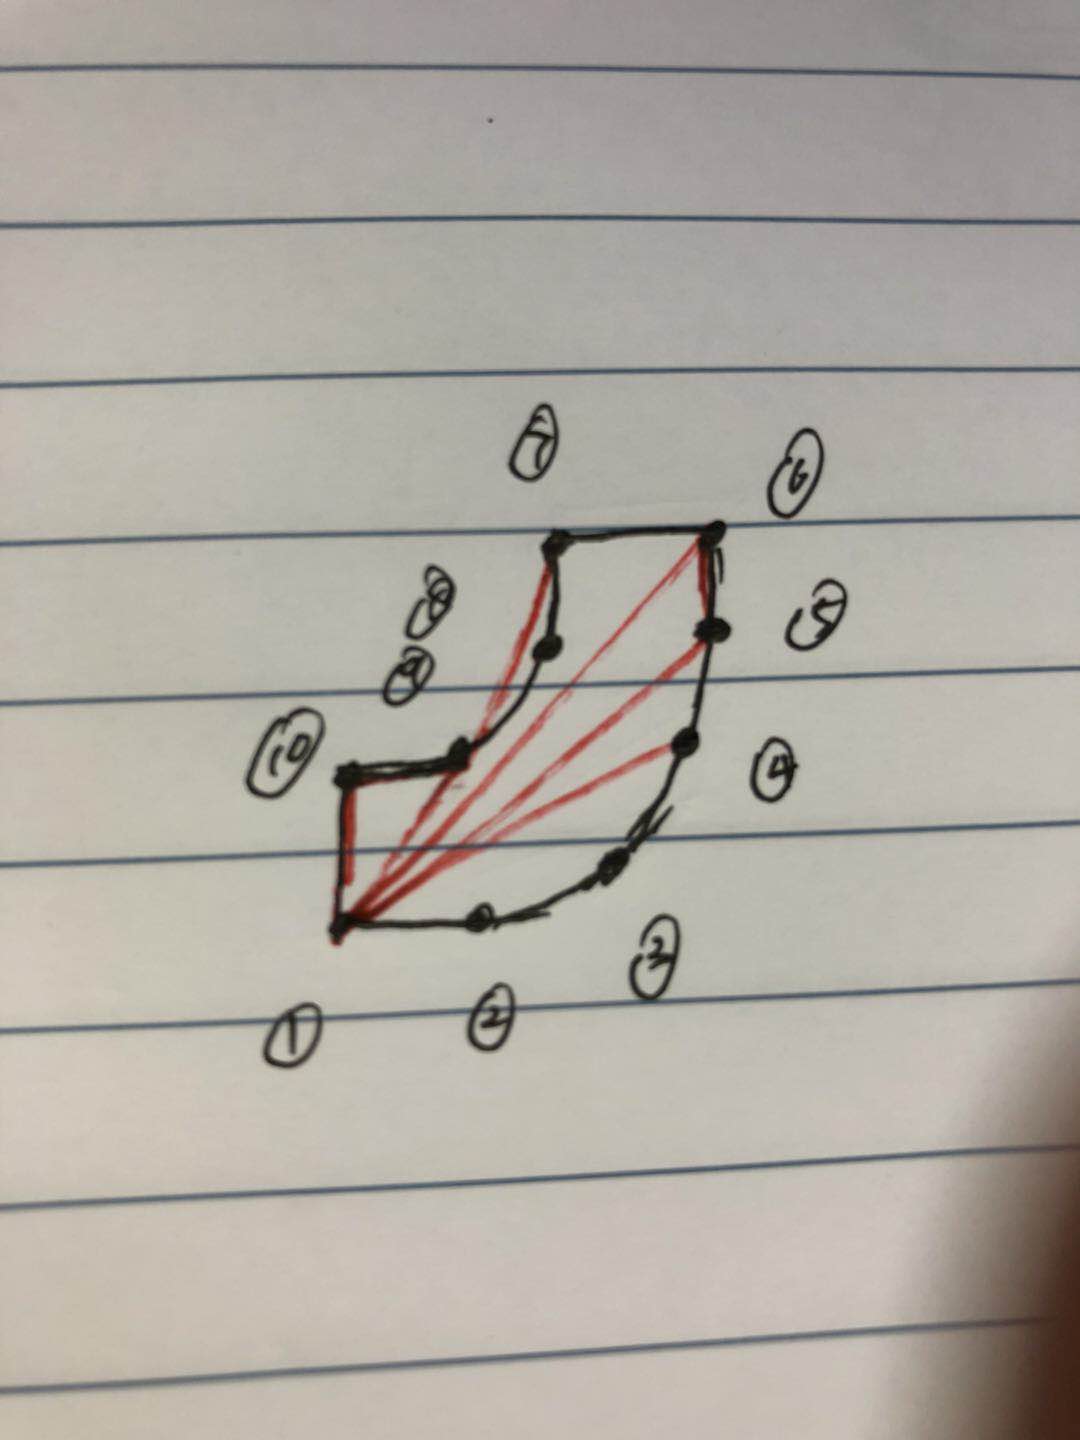
假设将这个四分之一圆环分成10个顶点的多边形时,还是以刚说的划分三角形的算法,那么小圆弧上的点与①号点构成的三角形,就超出了绘制范围。其中最为明显的就是①⑥⑦这三个点构成的三角形。
使用Tessellation正确的划分三角形
经过刚刚的源码分析,可以发现出现渲染错误的原因就是:绘制凹多边形时,划分三角形的方法有问题。谷歌一番,其实OpenGL提供了Tessellation的方法,来正确的划分三角形;但是OpenGL ES暂不支持。不过2008年的时候,有一个第三方库提供了iOS上Tessellation的功能。
下载该源代码,然后修改Makefile,生成静态库,导入Cocos2d-x中。然后看看如何修改Cocos2d-x源码来实现绘制凹多边形的:
1
2
3
4
5
6
7
8
9
10
11
12
13
14
15
16
17
18
19
20
21
22
23
24
25
26
27
28
29
30
31
32
33
34
35
36
37
38
39
40
41
42
43
44
45
46
47
48
49
50
51
52
53
54
55
56
57
58
59
60
61
62
63
64
65
66
|
void DrawNode::drawPolygonUseTessllation(const Vec2 *verts, int count, const Color4F &fillColor, float borderWidth, const Color4F &borderColor) {
CCASSERT(count >= 0, "invalid count value");
GLUtesselator *tess = gluNewTess();
if (tess) {
totolTessVecPointNum = 0;
drawNum = 0;
gluTessCallback(tess, GLU_TESS_BEGIN, (void (*)())tessBeginCB);
gluTessCallback(tess, GLU_TESS_END, (void (*)())tessEndCB);
gluTessCallback(tess, GLU_TESS_ERROR, (void (*)())tessErrorCB);
gluTessCallback(tess, GLU_TESS_VERTEX, (void (*)())tessVertexCB);
gluTessBeginPolygon(tess, 0);
gluTessBeginContour(tess);
GLdouble *quad = new GLdouble[count * 3];
for (int i = 0; i < count; i++) {
quad[i * 3] = verts[i].x;
quad[i * 3 + 1] = verts[i].y;
quad[i * 3 + 2] = 0;
}
for (int i = 0; i < count; ++i) {
gluTessVertex(tess, quad + i * 3, quad + i * 3);
}
gluTessEndContour(tess);
gluTessEndPolygon(tess);
gluDeleteTess(tess);
delete[] quad;
} else {
std::cout << "no tessellation";
exit(1);
}
V2F_C4B_T2F *triangles = (V2F_C4B_T2F *)(_buffer + _bufferCount);
V2F_C4B_T2F *cursor = triangles;
for (int i = 0; i < totolTessVecPointNum; i++)
{
V2F_C4B_T2F tmp = {tessVec2[i], Color4B(fillColor), __t(v2fzero)};
*cursor++ = tmp;
}
std::cout << "draw node is " << drawNum << std::endl;
_TSCommand.clear();
_TSNumber.clear();
_TSCommand.resize(drawNum);
_TSNumber.resize((drawNum));
for (int j = 0; j < drawNum; ++j) {
_TSCommand.push_back(tessSort[j][0]);
_TSNumber.push_back(tessSort[j][1]);
}
_bufferCount += totolTessVecPointNum;
_useTessellation = true;
_dirty = true;
}
|
Tessellation的主要工作就是:将多边形的顶点重新排序,然后依次指定这些顶点的绘制方式。有三种绘制方式:GL_TRIANGLES,GL_TRIANGLE_STRIP和GL_TRIANGLE_FAN
来看看Tessellation的回调函数:回调函数会在这些情况下发生:
- 重新指定一种绘制方式时 GLU_TESS_BEGIN
- 以该种绘制方式时,生成一个新的顶点时 GLU_TESS_VERTEX
- 结束该绘制方式时 GLU_TESS_END
- 发生错误时 GLU_TESS_ERROR
1
2
3
4
5
6
7
8
9
10
11
12
13
14
15
16
17
18
19
20
21
22
23
24
25
26
27
28
29
30
31
32
33
34
35
36
37
38
39
40
41
42
43
44
45
46
47
48
49
50
51
52
53
54
55
56
57
| float tessVec2[5000][2];
int tessSort[100][2];
int totolTessVecPointNum = 0;
int currentDrawTessPointNum = 0;
int drawNum = 0;
GLenum tessType;
const char* getPrimitiveType(GLenum type) {
}
void tessBeginCB(GLenum which) {
currentDrawTessPointNum = 0;
switch(which)
{
case 0x0004:
tessType = 1;
break;
case 0x0005:
tessType = 2;
break;
case 0x0006:
tessType = 3;
break;
default:
std::cout << "error tess type" << std::endl;
}
std::cout << "glBegin(" << getPrimitiveType(which) << ");\n";
}
void tessEndCB() {
tessSort[drawNum][0] = tessType;
tessSort[drawNum][1] = currentDrawTessPointNum;
drawNum++;
std::cout << "glEnd();\n";
}
void tessVertexCB(const GLvoid *data) {
const GLdouble *ptr = (const GLdouble*)data;
GLfloat pos1 = *ptr;
GLfloat pos2 = *(ptr + 1);
GLfloat pos3 = *(ptr + 2);
std::cout << "pos1 is " << pos1 << ", pos2 is " << pos2 << ", pos3 is " << pos3 << std::endl;
tessVec2[totolTessVecPointNum][0] = pos1;
tessVec2[totolTessVecPointNum][1] = pos2;
totolTessVecPointNum++;
currentDrawTessPointNum++;
}
void tessErrorCB(GLenum errorCode) {
const GLubyte *errorStr;
errorStr = gluErrorString(errorCode);
std::cerr << "[ERROR]: " << errorStr << std::endl;
}
|
Cocos2d-x底层渲染
通过Tessellation之后,已经将多边形的顶点重新排序,并重新指定了绘制方式。现在这些绘制方式和顶点已经记录下来了,需要修改DrawNode的draw方法进行渲染。
1
2
3
4
5
6
7
8
9
10
11
12
13
14
15
16
17
18
19
20
21
22
23
24
25
26
27
28
29
30
31
32
33
34
35
36
37
38
39
40
41
42
43
44
45
46
47
48
49
50
51
52
53
54
55
56
57
58
59
60
| void DrawNode::draw(Renderer *renderer, const Mat4 &transform, uint32_t flags)
{
if (_useTessellation) {
_customCommand.init(_globalZOrder, transform, flags);
_customCommand.func = CC_CALLBACK_0(DrawNode::onDrawUseTessellation, this, transform, flags);
renderer->addCommand(&_customCommand);
return;
}
if(_bufferCount)
{
_customCommand.init(_globalZOrder, transform, flags);
_customCommand.func = CC_CALLBACK_0(DrawNode::onDraw, this, transform, flags);
renderer->addCommand(&_customCommand);
}
}
void DrawNode::onDrawUseTessellation(const Mat4 &transform, uint32_t flags) {
getGLProgramState()->apply(transform);
auto glProgram = this->getGLProgram();
glProgram->setUniformLocationWith1f(glProgram->getUniformLocation("u_alpha"), _displayedOpacity / 255.0);
GL::blendFunc(_blendFunc.src, _blendFunc.dst);
if (_dirty)
{
glBindBuffer(GL_ARRAY_BUFFER, _vbo);
glBufferData(GL_ARRAY_BUFFER, sizeof(V2F_C4B_T2F)*_bufferCapacity, _buffer, GL_STREAM_DRAW);
_dirty = false;
}
int curIndex = 0;
int drawNumber = _TSCommand.size();
for (int i = 0; i < drawNumber; ++i) {
int curDrawType = _TSCommand[i];
int curVexNum = _TSNumber[i];
if (curDrawType == 1) {
glDrawArrays(GL_TRIANGLES, curIndex, curVexNum);
} else if (curDrawType == 2) {
glDrawArrays(GL_TRIANGLE_STRIP, curIndex, curVexNum);
} else {
glDrawArrays(GL_TRIANGLE_FAN, curIndex, curVexNum);
}
curIndex += curVexNum;
}
}
|
到此,就实现了在iOS设备上使用Cocos2d-x和OpenGL ES绘制凹多边形。
PS
由于是在iOS上使用Cocos2d-x,所以使用过程中会需要Objective-C和C++混编,可以参考这个教程 - 混编ObjectiveC++
对了,还有一些基本的Cocos2d-x渲染机制,我学习的这系列博客 - coco2d-x sourcecode analysis
参考
